


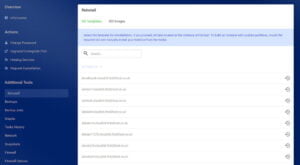
If you have installed your NVMe VPS instance using a distribution ISO. Then it’s likely your drive will be using a Logical Volume. Whilst generally, logical volumes are extremely handy, they pose some technical problems when trying to expand them. It’s not possible for us to automatically expand a logical volume. That’s because each instance will be using a different volume group. Therefore, the commands would be different for each user. You can, however, extend your logical volume in a few steps. To install from one of our ISO files, Use the “Reinstall” section and click the “ISO Images” tab.
Expand a Linux Logical Volume
This applies to all Linux Logical Volumes when you have added another hard drive or hotplugged space. The space is assigned to your instance but you need to expand the logical volume before you can use it. So in this guide, we will hotplug an additional drive into our development machine and look at how we expand the logical volume.
Find Your Volume Group
So before we start, we have a basic NVMe VPS. We have installed AlmaLinux 8 from the distribution ISO. We can see we have a logical volume that is 9GB and the volume group is called almalinux. Issue the vgdisplay command to find your volume group.
Now we have added another 10GB of space to our instance. So we now have a total of 20GB over two drives. We can confirm this by using the console. When space is hotplugged you will see a message from the Hypervisor confirming this. Because the space is hotplugged. There is no need to reboot your instance to use the additional space.

Extend Volume Group
Before we can use the new drive prepare the volume group. By using the fdisk -l we can see Discovery has already added the space to our instance. It’s attached at /dev/sdb with a total of 10GB free. This makes the process extremely easy.
Device     Boot   Start      End  Sectors Size Id Type
/dev/sda1  *       2048  2099199  2097152   1G 83 Linux
/dev/sda2       2099200 20971519 18872320   9G 8e Linux LVM


Disk /dev/mapper/almalinux-root: 8 GiB, 8585740288 bytes, 16769024 sectors
Units: sectors of 1 * 512 = 512 bytes
Sector size (logical/physical): 512 bytes / 512 bytes
I/O size (minimum/optimal): 512 bytes / 512 bytes


Disk /dev/mapper/almalinux-swap: 1 GiB, 1073741824 bytes, 2097152 sectors
Units: sectors of 1 * 512 = 512 bytes
Sector size (logical/physical): 512 bytes / 512 bytes
I/O size (minimum/optimal): 512 bytes / 512 bytes


Disk /dev/sdb: 10 GiB, 10737418240 bytes, 20971520 sectors
Units: sectors of 1 * 512 = 512 bytes
Sector size (logical/physical): 512 bytes / 512 bytes
I/O size (minimum/optimal): 512 bytes / 512 bytes
Issue the command below to extend the volume group to the new hard drive. Ensure you use the correct volume group name which you found using the vgdisplay command.
vgextend almalinux /dev/sdb

Physical volume "/dev/sdb" successfully created.
Volume group "almalinux" successfully extended
Expand Linux Logical Volume
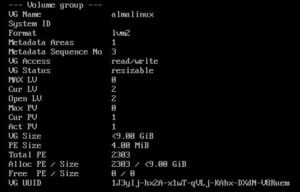
So now we are ready to extend the logical volume (LV). If we issue the vgdisplay command we can see the free space in the Free PE / Size field. We can also see the volume group size is now 18.99GB. We can choose to expand the logical volume to use all of the free space or just some of it.
[root@dev ~]# vgdisplay
  --- Volume group ---
  VG Name               almalinux
  System ID
  Format                lvm2
  Metadata Areas        2
  Metadata Sequence No  4
  VG Access             read/write
  VG Status             resizable
  MAX LV                0
  Cur LV                2
  Open LV               2
  Max PV                0
  Cur PV                2
  Act PV                2
  VG Size               18.99 GiB
  PE Size               4.00 MiB
  Total PE              4862
  Alloc PE / Size       2303 / <9.00 GiB
  Free  PE / Size       2559 / <10.00 GiB
  VG UUID               1J3yIj-hx2A-x1wT-qVLj-KAhx-DXdN-V8Ruem
Using blkid we can see our LV is the root partition.
blkid
So to expand the logical volume and use all of the free space issue the lvextend command with -l +100%FREE and the path to the logical volume.
lvextend -l +100%FREE /dev/mapper/almalinux-root

Size of logical volume almalinux/root changed from <8.00 GiB (2047 extents) to 17.99 GiB (4606 extents).
Logical volume almalinux/root successfully resized.
Extend Filesystem
And finally, extend the file system. Our images use XFS so use xfs_growfs and the path to the volume.
xfs_growfs /dev/mapper/almalinux-rootThat’s the process complete. We can now see by using the df -h command that our volume group has been extended. And our logical volume has been extended.
[root@dev ~]# df -h
Filesystem                  Size  Used Avail Use% Mounted on
devtmpfs                    353M     0  353M   0% /dev
tmpfs                       373M     0  373M   0% /dev/shm
tmpfs                       373M  9.8M  363M   3% /run
tmpfs                       373M     0  373M   0% /sys/fs/cgroup
/dev/mapper/almalinux-root   18G  1.8G   17G  10% /
/dev/sda1                  1014M  182M  833M  18% /boot
tmpfs                        75M     0   75M   0% /run/user/0
That’s the process of extending a logical volume or expanding a logical volume on the discovery network. Using Hotplugging is a great way to instantly provide additional resources without having to disrupt your production server.